Are you looking to unlock the full potential of your PhonePe wallet, including increasing your transaction limits up to ₹2 lakh? Completing your Video KYC is the key! This detailed guide will walk you through each step of the PhonePe Video KYC process, ensuring a smooth and successful verification.
Upgrading your PhonePe wallet through Video KYC provides several advantages, mainly a significantly higher wallet limit. It allows you to withdraw your wallet balance to your bank account, add up to ₹2 lakh, transfer money to any bank account, or pay bills. With minimum KYC, the wallet limit is only ₹10,000, while completing full Video KYC can increase your wallet limit up to ₹2 lakh.
Table of Contents
PhonePe Wallet Video KYC: Step-by-Step Guide to Upgrade Your Limit up 2 Lakh
Getting your PhonePe wallet limit upgraded to ₹2 lakh is a straightforward process involving a Video KYC. This digital verification method ensures compliance and enhances your wallet’s capabilities.
Here’s a comprehensive breakdown of each step you need to follow to complete your PhonePe wallet Video KYC and enjoy an upgraded limit.
Step 1: Open the PhonePe App and Navigate to Wallet
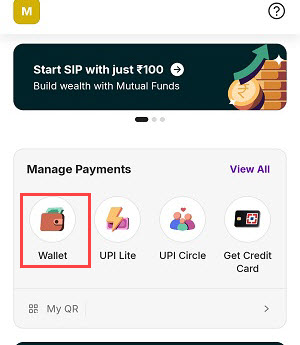
Open the PhonePe application on your mobile device. Once the app loads, swipe up on the home screen to reveal more options. Locate and tap on the “Wallet” option. This will take you to your PhonePe wallet section.
Step 2: Initiate the KYC Process for ₹2 Lakh Limit
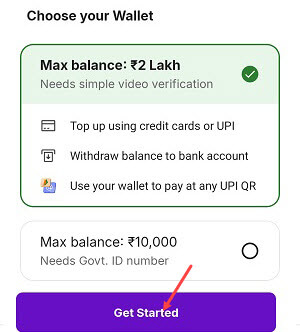
In the wallet section, you will see two options for your wallet limit. To upgrade your limit to ₹2 Lakh, select the option that states “Max balance: ₹2 Lakh” and indicates “Needs simple video verification.” After selecting this option, tap on the “Get Started” button to proceed with the KYC process.
Step 3: Enter Your PAN Details
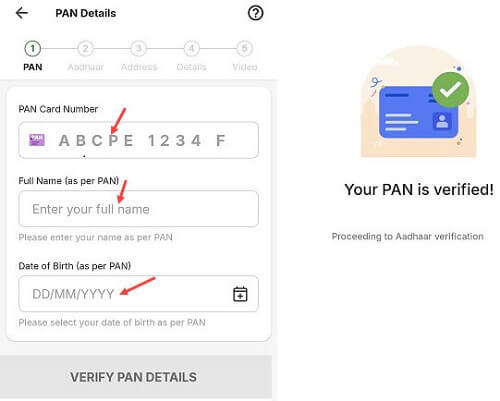
The next screen will prompt you to enter your PAN details. Carefully fill in your PAN Card Number, your Full Name as it appears on your PAN card, and your Date of Birth. Once all the details are entered, tap on “Verify PAN Details.” The system will then verify your PAN card information.
Step 4: Consent to Aadhaar Verification
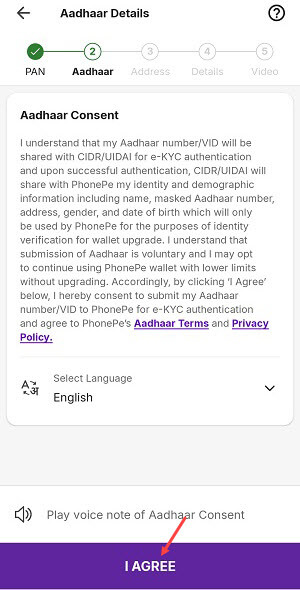
After successful PAN verification, you will be directed to the Aadhaar details section. Read the Aadhaar consent details thoroughly. To proceed, tap on the “I Agree” button.
Step 5: Enter Aadhaar Details and Verify OTP
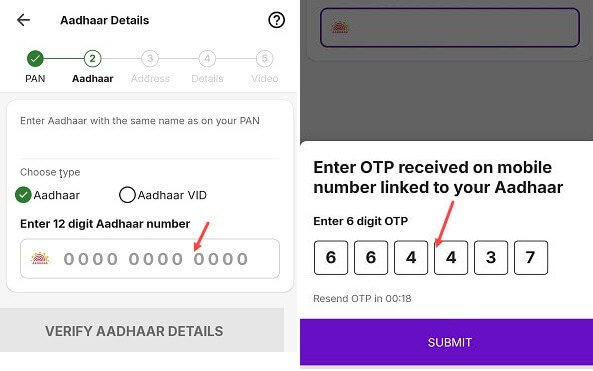
Now, enter your 12-digit Aadhaar number or your Aadhaar VID (Virtual ID). After entering the number, tap on “Verify Aadhaar Details.” An OTP (One-Time Password) will be sent to the mobile number linked to your Aadhaar. Enter this 6-digit OTP into the designated field and tap “Submit.” Your Aadhaar card will then be successfully verified.
Step 6: Confirm Your Aadhaar Linked Address
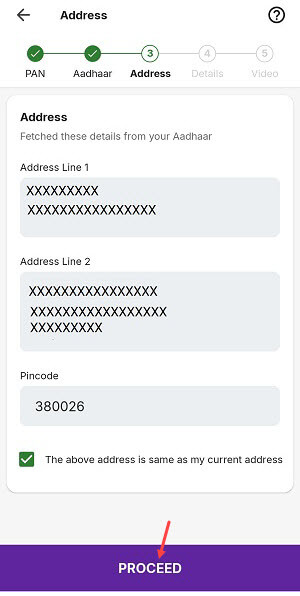
Once your Aadhaar is verified, your linked address will be fetched and displayed on the screen. Review the address details to ensure they are correct. If the displayed address is your current address, tick the box confirming “The above address is the same as my current address.” Then, tap on “Proceed.”
Step 7: Provide Personal Details
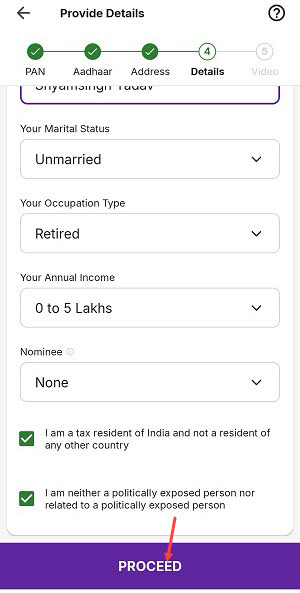
You will now need to provide additional personal details. This includes selecting your Parent Details, Marital Status, Occupation Type, and Your Annual Income range. You will also have the option to add a Nominee. Fill in all the required information accurately.
Step 8: Initiate Video Verification
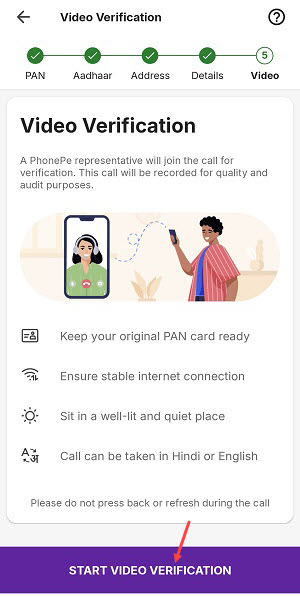
After filling in your personal details, you will reach the Video Verification screen. Before starting the call, ensure you have your original PAN card ready, a stable internet connection, and are in a well-lit and quiet place. The call can be conducted in Hindi or English. To start the live video call with a PhonePe representative, tap on “Start Video Verification.”
Step 9: Complete the Video KYC Call
During the video call, the PhonePe executive will ask you to show your original PAN card for verification. They will also take a photo of you. Follow their instructions carefully to complete the verification.
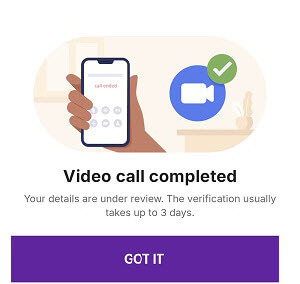
Step 10: Await KYC Verification
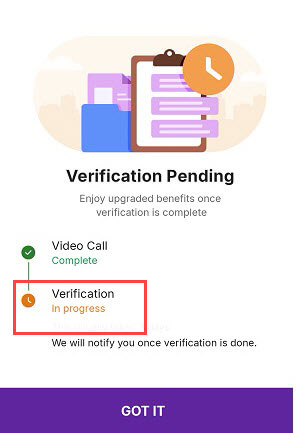
Once your video call is completed, you will see a “Video call completed” message. Your details will be under review, and the verification typically takes up to 3 days. You will be notified once the KYC verification is done. The video indicates that KYC verification will be completed within 1 day.
Step 11: Enjoy Your Upgraded PhonePe Wallet
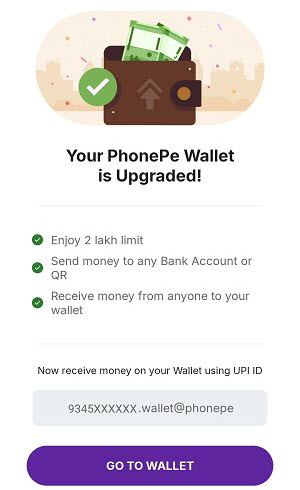
Upon successful verification, your PhonePe wallet will be upgraded! You will receive a confirmation stating, “Done! Your PhonePe Wallet is now Active & Upgraded.” This means you can now enjoy an increased limit of ₹2 lakh, send money to any bank account or QR, and receive money from anyone to your wallet. You can also add up to ₹2 lakh to your PhonePe wallet using various payment methods like UPI, debit card, or credit card.
Can I Complete Video KYC Later?
Yes, absolutely! If you are unable to complete the Video KYC in one go, you can always resume it later. Simply go to your Wallet section in the PhonePe app, and tap on “Resume KYC.” From there, you can continue from where you left off, specifically under the “Video Verification” section by tapping “Verify.”
To successfully complete your PhonePe Wallet Video KYC and access enhanced features and higher transaction limits, follow these steps. You can use your own PAN card or a family member’s for the video KYC. Ensure that the PAN card you use matches the Aadhaar card and that the same person is present during the KYC process.